**Foreword:**
Sometimes, it feels like there's an overwhelming amount of content online about porting uC/OS-II, but most of it is dry, theoretical, and filled with hypothetical scenarios. I often wonder—do these authors actually test their work? There's a serious lack of practical guidance. In my own experience, I've gone through many detours during the porting process. That’s why I’m documenting my journey step by step, hoping it can serve as a useful reference for others.
To begin with, here's a brief summary of the general porting process:
1. Visit the official uC/OS-II website to download the relevant example code for the CPU you want to port. It doesn’t have to be exact, but it should match the series you're targeting.
2. Choose your development environment—either IAR or MDK—and download the corresponding example.
3. This example is for porting uC/OS-II to STM32F103ZET6, and I'm using MDK. Unfortunately, the official example is based on IAR, so I had to adapt it accordingly.
4. First, create a simple bare-metal program without an operating system to ensure everything works. The purpose of this is to catch errors early. Without an OS, any issues will become more complex to debug. So, don't skip this step. It's crucial to build a basic working project before moving forward.
5. The main changes during porting involve adding or removing header files and modifying the PendSV_Handler and SysTick_Handler in the vector table. I must say, some online resources suggest changing OS_CPU.H and various functions, which is unnecessary. These are already provided in the official examples. Unless you're dealing with a very obscure CPU, you shouldn't need to modify them yourself.
Now, let’s dive into the detailed steps of the porting process.
**First, create a simple bare-metal system without an operating system**
**1. Create a source file project folder structure as shown below:**
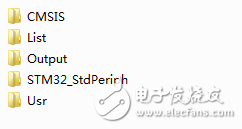
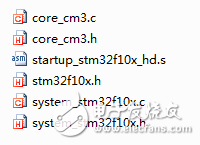
The "CMSIS" folder contains the kernel interface files, as shown below:
The "STM32_StdPeriph" folder includes all the standard peripheral firmware for STM32.
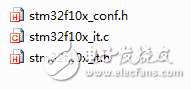
The "User" folder contains your custom code, as follows:
The "Output" and "List" folders are used to store compilation-generated files, helping keep the project organized.
**2. Use MDK to create an OS-free project. Here's the project file tree:**
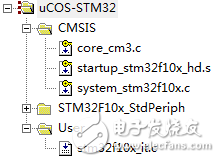
At this point, there is no main file, so create a "main.c" file. After creating it, make sure to add it to the project, not just save it. As shown below:
Note: Your main.c file must contain a `main()` function; otherwise, the compiler will throw an error.
Next, configure the project settings carefully. Here are the key points:
(1) **Output Options**:
Make sure to check "Create HEX File" and set the output directory to the "Output" folder you created earlier.
(2) **List Options**:
Place the generated list files into the "List" folder for better organization.
(3) **C/C++ Configuration**:
In the Define options, enter: `USE_STDPERIPH_DRIVER`, `STM32F10X_HD`. This tells the compiler to use the standard peripherals and specify the CPU type. Make sure to adjust the CPU definition according to the target chip. Include Paths should include all necessary header files.
(4) **Debug Options**:
Set up the debugger according to your hardware setup, ensuring that the correct device and interface are selected.
By following these steps, you'll have a solid foundation before proceeding with the actual porting of uC/OS-II. This ensures that any future errors can be traced back to the OS migration rather than the base system.
We have supplied our Lighting poles to Australia, Columbia, England, Kuwait, Iraq, Philippines, Pakistan and etc.
Our Lighting poles are made from quality sheet through bending, forming, automatic welding and hot galvanization. We can reach one-run machining length of 14m and can bend sheet of thickness up to 45mm. We adopt advanced welding procedures, automatically weld main joints and reach rank-II welding quality.
Lighting Pole, Transmission Line Pole, Solar Lighting Pole, Single Arm Lighting Pole
JIANGSU XINJINLEI STEEL INDUSTRY CO.,LTD , https://www.steel-pole.com